3.12.2024

Tulip Cottage Zipper Pouches & a Free 6" Zipper Pouch Pattern

Today I am sharing the cute zipper pouches I made with the adorable new fabric line Tulip Cottage by Melissa Mortenson for Riley Blake Designs.


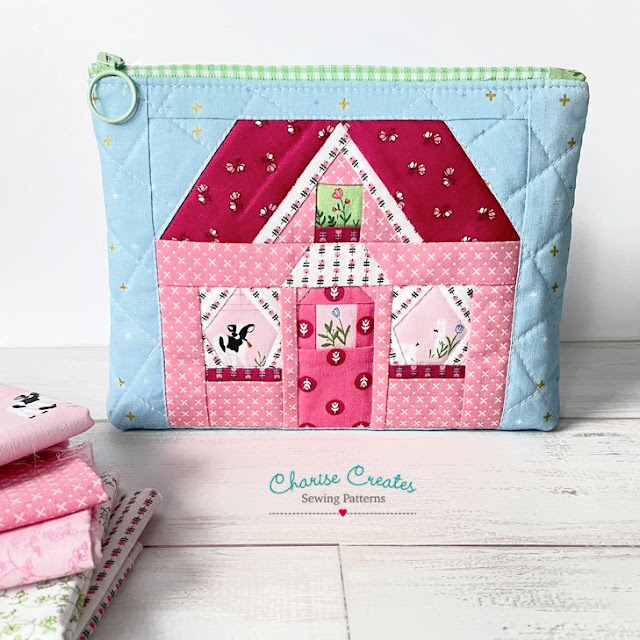
The first pouch I made uses my Free Tulip paper piecing pattern for the focal point on my "Home Sweet Home" boxy zipper pouch.  The zipper pouch can also be used to hold fat quarters : )  

Find the Tulip pattern [HERE]

Find the Home Sweet Home Boxy Zipper Pouch [HERE]


The fabric line is perfect for fussy cutting.  Those rabbits and cows are just adorable!

I love the zipper charm from at Sew Be!


On the back of the Boxy Zipper pouch I used "Pink Flower Fields" print.


I also made a Cottage zipper pouch!  The pouch is made with my Cottage paper piecing pattern.  

The pouch is a free pattern you can find at the bottom of this post!


If you make any projects with Tulip Cottage fabric be sure to tag your photos on social media with the hashtags:

#ILoveRileyBlake #RileyBlakeDesigns #TulipCottageFabric

I love to see what you make : )

Happy Sewing!

xo

Charise

6" Quilt Block Zipper Pouch

Find the Pattern [HERE]

Notes: ~All seam allowances are 1/4". 

    Back stitch at the beginning and end of each seam.

Finished Size:  6" tall x 8" wide

Materials:

~ 6" finished / 6 1/2" unfinished quilt block

~ 1/4 yard shell fabric

~1 - 1" x 1 1/2" Print for the zipper tab

~ 1/4 yard lining

~ 1/4 yard batting

~ 1/4 yard muslin or canvas

Supplies:

~Zipper Foot
~Matching Thread
~Pins
~9" or longer coil zipper 
~Marking pen, pencil or Hera Marker for quilt marking

Cut:

~ Shell (background) Fabric: 2 - 6 1/2" x 2 3/8" rectangles, 1 - 1 1/4" x 8 1/2" , 1- Main     Panel 

~Print Fabric for zipper tab:     1 - 1" x 1 1/2" 

~Fusible Batting     ~2  Main Panel

~Muslin or Canvas  ~2  Main Panel
~Lining                      ~2  Main Panel


Sewing Instructions:

1.  Stitch the 6 1/2" x 2 3/8" shell fabric rectangles to the left and right side of the quilt block.  Press.

Stitch the 1 1/4" x 2 1/2" strip, centered, on the bottom of the block. Press.


2.  Place the pattern on the panel and trim to size.  Fuse the Batting to the back of the panel.

Place the muslin or canvas Main Panel on the back.  

Quilt through all layers as desired.   

Repeat for the Back Pouch Panel.


3. Trim the zipper to 7 1/2" measuring from the top of the zipper head to the bottom of the zipper.

4. On the 1" side of the zipper tab, fold 1/4" to the wrong side. Press.

    Press in half wrong sides together.


5.  Place the bottom end of the zipper so that it is against the folded edge of the tab.
    Pin in Place.
    Stitch the folded edge with an edge stitch.


6. Fold back the zipper tape on the top edge of the zipper to the wrong side. 
     Glue baste or machine baste in place.


7. Place the zipper to the pouch right sides together with the top edges of the pouch
     and zipper tape matching.
    Center the zipper on the pouch panel.  Stitch the top edge with
    a 1/4" seam allowance.


8. Place the lining right sides with the pouch panel right side matching the top raw edge.
      Pin in place.
The zipper will be sandwiched in between the pouch and lining panels.
    Stitch the top edge with a 1/4" stitch.

9. Press the pouch and lining panels away from the zipper.  Press.
     Top stitch 1/8" away from the seam line.

~Repeat for the other side~


10.
 
Separate the lining pieces from the pouch pieces.
     Place the pouch pieces right sides together, matching seams and raw edges.  
     Pin in place.

     Place the lining pieces right sides together, matching seams and raw edges.  
     Pin in place.
     The zipper teeth should face towards the lining.
     ****Make sure the zipper is open.
     Sew the sides and bottom of the shell and lining,  leaving a 4" opening on the       bottom lining side.
Press the seams open.


11. Box the corners:
      Place the bottom and side seams right sides together at the bottom corner 
      with seams pressed open.
      Stitch the seam.
      Repeat for the other bottom corner.
Repeat for the lining.

12.  Turn right side out and press.
        Machine stitch or hand stitch the opening in the lining closed.

3.02.2024

Barbie Fabric Collection ~ Mini & Ruffle Purse


I'm so excited to show you my new projects made with the new Barbie collection Licensed by Riley Blake Designs. I think this may be my favorite Barbie collection to date!  I love a good gingham for my projects and not only does this fabric line include adorable prints, it even includes an exclusive B for Barbie gingham!

I love the Barbie Main print and I used it on both of the purses I made. The print includes all the Barbies in an adorable medallion design.


The cute little mini purse is made from my "Home Sweet Home" zipper pouch. The zipper closure was replaced for a magnetic clasp on the lining.

One side of the mini purse is a 9 Patch block that measures 6" square. I use the Barbie Main print and the Sunglasses print to create the 9 patch block. 

I used the selvage to create the handles. I love the Barbie script and.....

the Barbies icons on the selvages! I used the Barbie Dolls print for the lining - so fun!


If you'd like to make a 6" 9 Patch block follow the instructions below ~ (It also makes a cute coaster!)

To make a 6" finished / 6 1/2" unfinished 9 Patch Quilt Block:

Cut 5 - 2 1/2" square of the Barbie Main print with your favorite Barbies : )

Cut 4 - 2 1/2" squares of the Sunglasses print


1)  Arrange the Prints in 3 rows as shown.  Sew the rows together.  Press towards the dark squares

2)  Stitch the rows together.  Press seams open.


I cannot wait to use this adorable cross body bag this Spring. The pattern is my Ruffle Purse and is a roomy cross body bag with an outside patch pocket and interior pocket.

The blue color way of this line is such a pretty shade of turquoise and I adore the pop of yellow. The Barbie gingham is the perfect basic for the bias trim and handle.

Visit my Etsy shop [HERE] 


I hope you make a project with the new Barbie fabric collection. Please be sure to tag your photos on social media with the hashtags:

#BarbieFabric #ILoveRileyBlake #RileyBlakeDesign

I love to see your makes!

Happy Sewing

Charise : )


2.19.2024

"To Grandmother's House" Ruffle Basket


Hi! I'm so thrilled to share  a new project made with the adorable new fabric, “To Grandmother’s House” designed by Jennifer Long for Riley Blake Designs.


“To Grandmother’s House” has the most adorable prints and many of the prints are perfect for fussy cutting. If you have followed me on Instagram or here on my blog, you know how much I love a good fussy cut print. 

Grandmother, Little Red and the Wolf were perfect for the windows of my “Cottage Block” Pattern which is the feature of this basket.

You can find the Cottage Block and Ruffle Basket Patterns in my Etsy shop.


I made another cute little basket with my “Curvy Basket” pattern and featured “Through the Woods” print. 

I love how it turned out. You can never have too many cute storage containers for your sewing room : )


I hope my projects inspire you to sew with "To Grandmother's House"

If you do make a project with this adorable fabric, be sure to tag your photos on social media with the hashtags:

#IloveRileyBlake #RileyBlakeDesigns #ToGrandmothersHouseFabric

I love to see what you make!

Happy Sewing

xo

Charise : )


1.10.2024

Flora No.6 Ruffle Purse and an Apple Pouch


Hi! Today I'm sharing projects from the beautiful new "Flora No 6" collection by Echo Park Paper Co.

I chose to use the pink palette of lovely florals, ginghams and a beautiful watercolor floral print. The line also includes pretty yellow and blue color ways. View the entire collection [HERE]

The purse is made with my Diamond Patchwork Purse pattern which has a roomy outside pocket, and button and loop closure.  I added a ruffle to the pocket and with the cute coordinating gingham.

The outside pocket was perfect for the gorgeous "Cloud Main" Watercolor Floral print. I used "Raspberry Gingham" for the Ruffle and "Pink Daisies" for the body. 

Raspberry Blossom was the perfect basic for the straps and purse gusset.

I added a sweet little patch on the back of the purse made with the main Floral print.


My Apple Pouch turned out so cute in the same prints! 

The Apple Pouch pattern is FREE on my blog and you can find it [HERE]


The Apple Zipper Pouch is approximately 6" x 5" - a perfect size for organizing small items. 

It would also be a fun gift and perfectly sized for a gift card.


Please be sure to share your projects made with “Flora” fabric on social media with the hashtags 

#FloraFabric #ILoveRileyBlake #RileyBlakeDesigns - I love to see what you make!

You can follow me on Instagram at Charise Creates to see more of what I'm up to : )

Happy Sewing!

Charise

12.12.2023

Apple Zipper Pouch Pattern and Tutorial


Hello and Happy Holidays!

Today I'm sharing a pattern for an adorable Apple Zipper Pouch.  It would make a great gift and is a perfect size for credit cards, makeup essential and anything that would fit into a petite zipper pouch : )

Enjoy!

Apple Zipper Pouch

4 1/2"  x  5 1/2" 

Fabric:

A Left Front: 10" square

B Right Front: 10" square

C Back: 1/4 yard

Apple Stem: 3 1/2" x 2"

3/8" double fold Bias strip - 22 1/2"  (To make your own binding, see my tutorial HERE)

Fusible Fleece: 6" x 14"

Materials:

1/2" D ring

9" coil zipper (You can also use a 4" metal zipper which can be found [HERE]

Cute zipper pull (optional)

Cut:

Light Print - 1 -A, 1 -B

Dark Print - 1 -A, 1 -B

Print for Back - 2 - C

Fusible Fleece - 1 -A, 1 -B, 1- C

Apply the Fusible Fleece

Apply the fusible fleece to A, B and C following manufacturer directions

Find the Pattern [HERE]


1. Trim the coil zipper to 4 1/2" measuring from the top of the zipper head.  Stitch along the bottom of the zipper 1/4" from the edge and the top 1/4" from the edge.


2. Place the unfused Fabric Apple C wrong side up.  Place the fused Fabric Apple C on top, right side up.  Pin layers together.

Quilt the Apple as desired.  I used a 1" diamond grid pattern.


3.

A. Fold the 3 1/2" x 2" strip in half wrong sides together along the long side.  Press.

B. Unfold the strip.  Match the raw edge to the center crease and press.

C. Repeat for the second side.  Press

D. Press in half.

E. Edge stitch both sides of the strip.

4.  Thread the strip through the D-ring.  Baste along the top edge 1/4" from the edge.


5. Place the strip on the back Apple centered at top, matching raw edge.  Baste in Place 1/4" from the raw edge,


6. Place the zipper right sides with the Left Fused Fabric Apple.  Pin in place.  Stitch with a 1/4" stitch.

Place the Light Fabric Right Apple on top - sandwiching the zipper.  Stitch with a 1/4" stitch.


7.  Press the  Apple away from the zipper.  Top stitch 1/4" from the edge.

Repeat for the Apple B - Right side.

Quilt the Left and Right Panels as desired.


8.  Place the Zipper Panel on top of the back panel matching raw edges.  Baste around the perimeter 1/4" from the raw edge.


9.  Fold under 1/4" on one short edge of the bias binding strip. Place the binding at the bottom of the back apple matching raw edges.  Pin the binding around the perimeter of the apple.


10. Stitch around the perimeter with a 1/4" stitch.  When you reach the starting point, stitch 1/2" beyond the folded edge back stitching at the end.  Trim the bias tape close to stitching.


11. Fold the bias to the front side just covering the stitching and pin in place.  Edge stitch the binding in place.


I love to see your creations!  Please share your makes on social media with the hashtags:

#ChariseCreates #ChariseCreatesPattern #ApplePouch


Happy Sewing!

Charise